Table of Contents
Kimi K3 can be connected to a compatible AI coding extension in Visual Studio Code through a custom API endpoint. This approach is useful when a browser-based Kimi session is rate-limited or requires a subscription, because the editor connects through an API provider instead.
The setup has two parts: create an API key with a provider that offers the Kimi K3 model, then add that key, the provider base URL, and the correct model ID to your VS Code extension. Once saved, Kimi K3 can be selected like any other coding model in the extension.
What You’ll Learn
- Create an API key and record the associated endpoint details securely.
- Add Kimi K3 as a custom model in a compatible VS Code AI extension.
- Use chat completions and disable vision when the selected model is text-only.
- Test the connection with a simple prompt before using it on a project.
What You Need Before Configuring Kimi K3
- Visual Studio Code with an AI coding extension that supports custom providers or OpenAI-compatible endpoints.
- An account with an API provider that lists Kimi K3 and permits API-key creation.
- A generated API key, plus the base URL and model identifier supplied by that provider.
- A small test workspace so you can verify the connection without exposing production code or secrets.
The configuration screens differ between extensions, but the required information is usually the same: an API key, request format, model ID, model name, base URL, and capability settings such as vision support.
Why Use Kimi K3 for AI Coding in VS Code?
Kimi K3 is positioned as an open-weight, multimodal agentic model for reasoning and long-horizon tasks. Its published model information describes a mixture-of-experts architecture with 2.8 trillion total parameters and a context window of up to one million tokens.
For developers, a large context window can be useful when a task involves many files, lengthy specifications, logs, or an extended debugging conversation. In practice, however, results also depend on the coding extension, the provider’s API limits, prompt quality, and how much repository context is included.
It is best to treat Kimi K3 as a potential Claude Code alternative for supported workflows, not as a guaranteed replacement for every coding task. Test it on the languages, projects, and tool actions that matter to you.
Step 1: Generate a Kimi K3 API Key
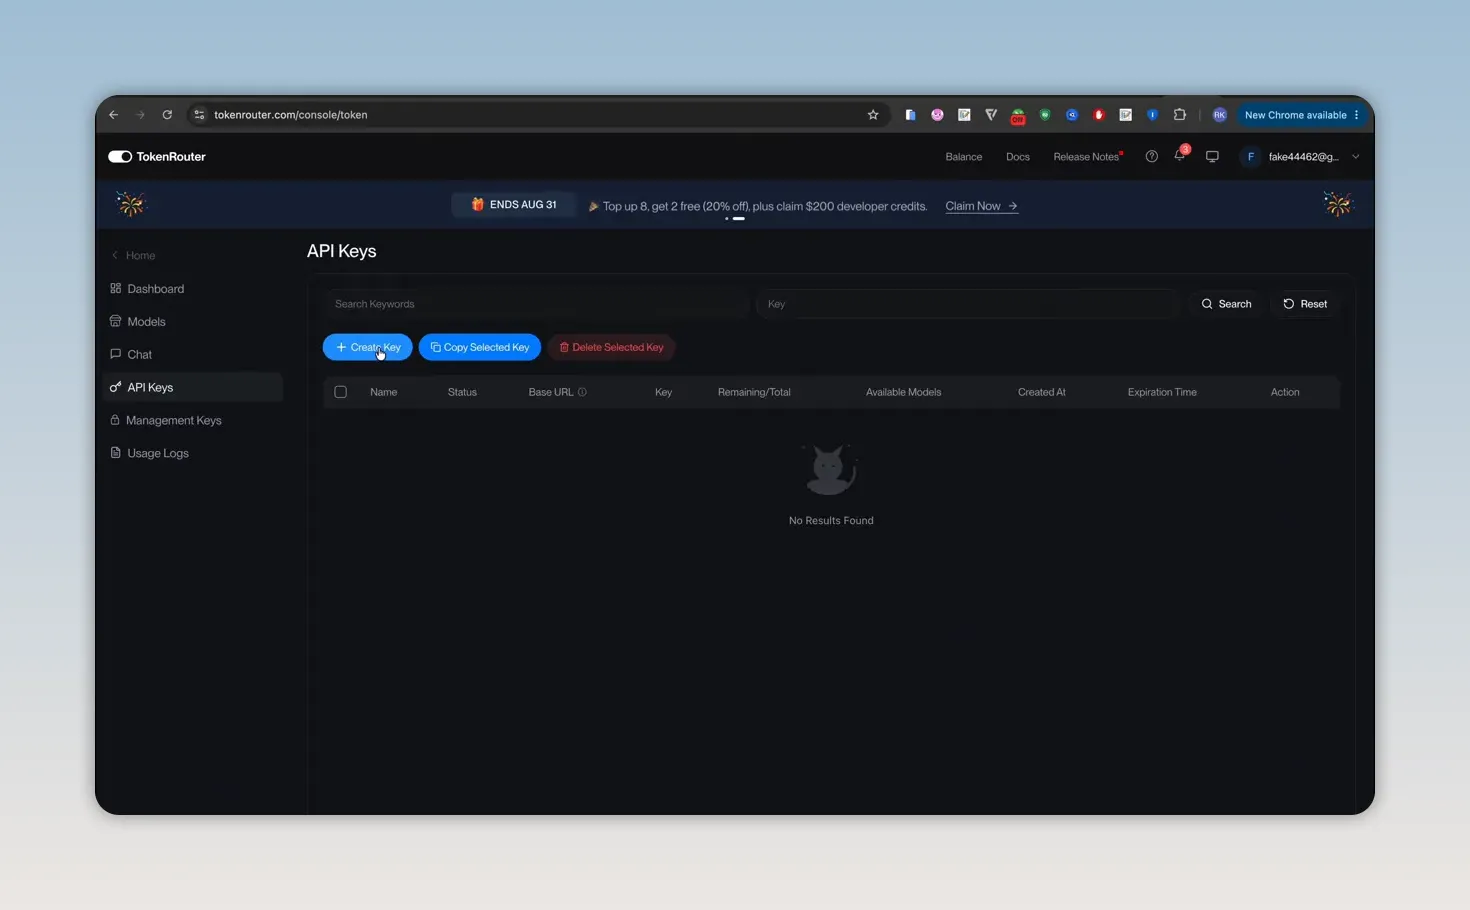
Start at the provider dashboard where Kimi K3 is listed. Sign in, open the API-key area, and choose the option to create a new key.
- Give the key a recognisable name, such as vscode-kimi-k3.
- Select an expiry period that suits your security policy. A short-lived key is safer for testing.
- Review any available quota or usage controls.
- Create the key and copy it immediately if the dashboard displays it only once.
- Record the provider’s base URL and exact model ID alongside the key.
Keep the API key private. Do not paste it into source files, commit it to Git, share it in screenshots, or include it in public issue reports. If a key is exposed, revoke it in the provider dashboard and generate a replacement.
Step 2: Open Your AI Extension’s Model Settings
In VS Code, open the sidebar for the AI coding extension. Locate the model picker, then look for an option such as Other Models, Settings, Add Model, or Custom Endpoint.
The setup shown here uses an extension menu labelled “Auto”, followed by an option for other models and settings. Your extension may use different labels, but the goal is identical: open the form that lets you define a provider-managed model manually.
Select a custom endpoint
Choose Custom Endpoint rather than a built-in provider option. Give the connection a readable internal label, such as “Kimi K3” or “Kimi K3 API”. This name is for the model picker and does not have to match the provider’s technical model ID.
Step 3: Enter the API Connection Details
Paste the API key when prompted, then select the request style. The available choices may include:
- Chat Completions
- Responses
- Messages
For this configuration, select Chat Completions. This is commonly used by OpenAI-compatible API endpoints. Do not select a different format unless the provider documentation explicitly requires it.
Complete the remaining fields using the information from the provider dashboard:
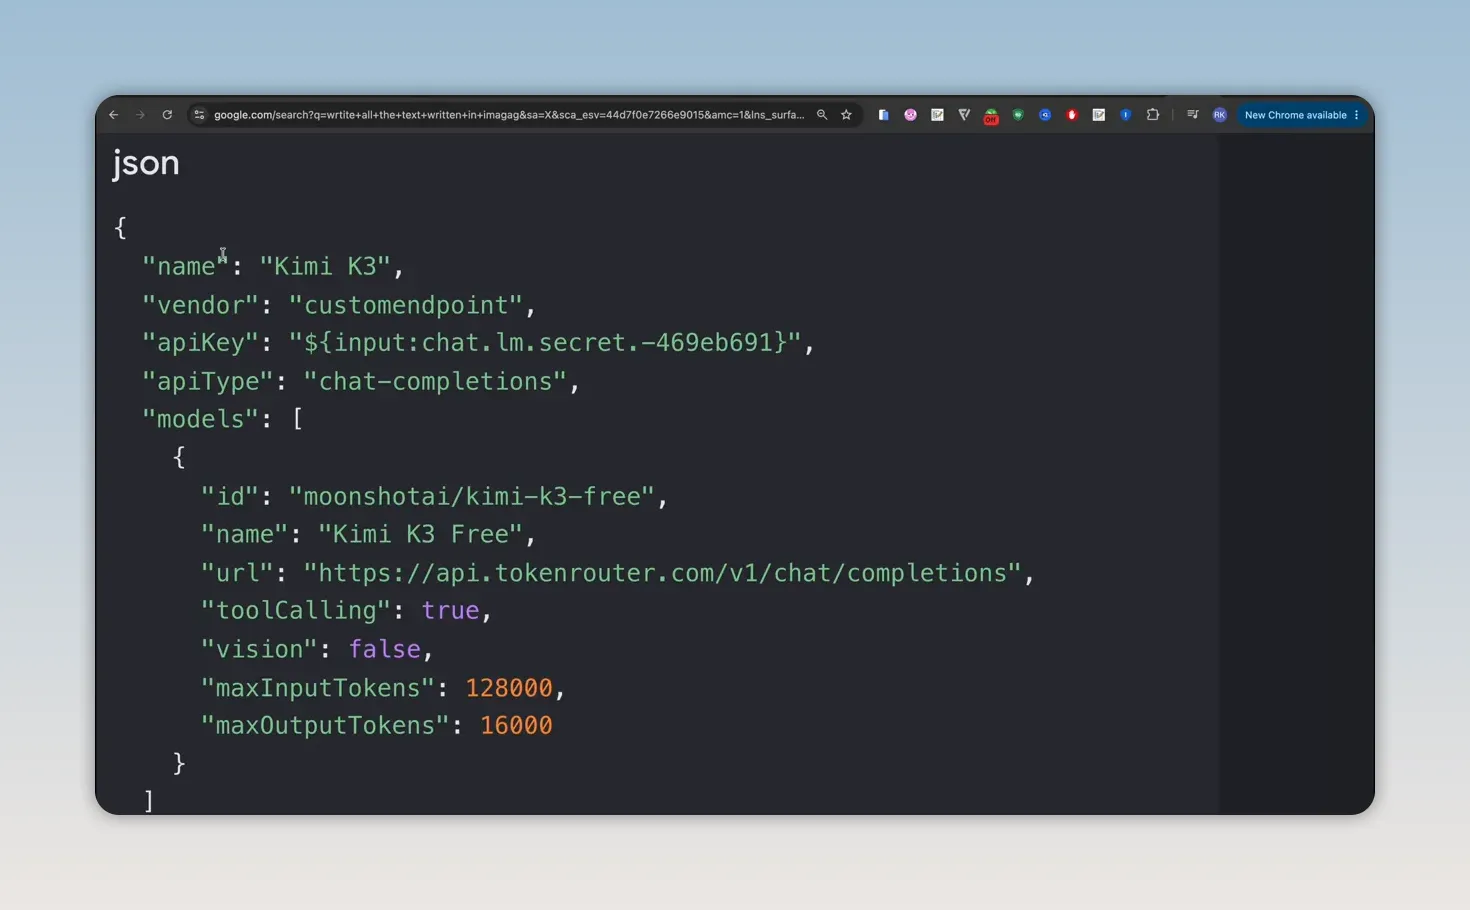
- Model ID: Enter the exact identifier provided for Kimi K3. This field is case-sensitive on some services.
- Display name: Use a clear name that helps you identify the model in VS Code.
- Base URL: Paste the provider endpoint exactly as supplied.
- Vision: Set this to false for the text-focused configuration shown here.
The model configuration is typically stored as JSON by the extension. The visible structure below illustrates the types of values required: a named custom endpoint, an API key reference, a model entry, a base URL, chat-completions support, and vision disabled.
Save the configuration and close the settings panel. Reopen the model picker if the new model is not immediately visible.
Step 4: Select Kimi K3 and Test the Connection
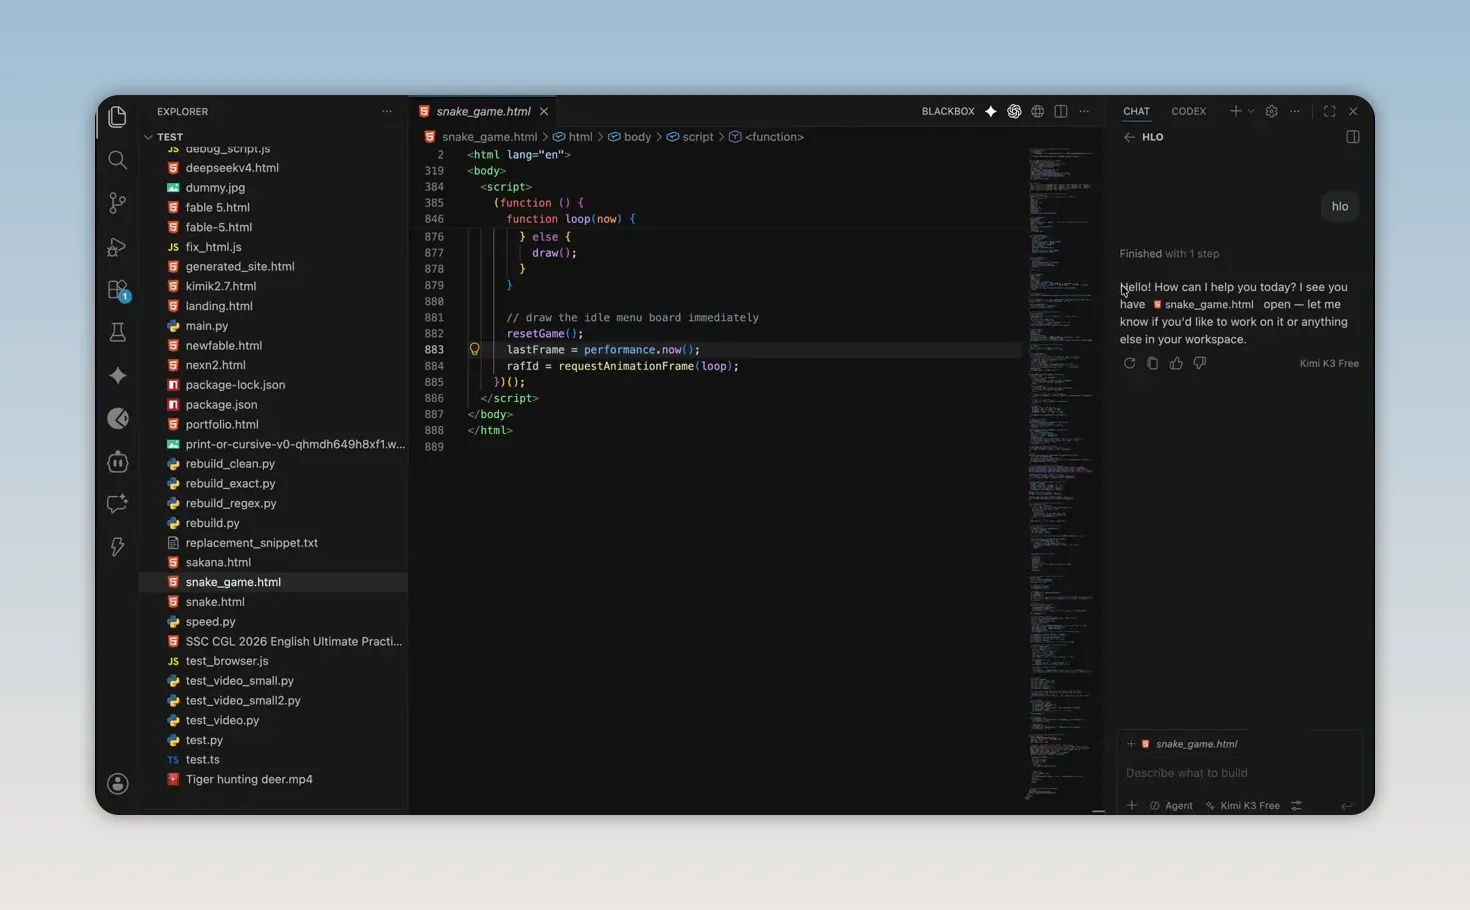
Choose the newly created Kimi K3 entry from the extension’s model list. Before asking it to edit code, send a minimal prompt such as a greeting or a request to describe the current workspace.
A successful response confirms that the following elements are aligned:
- The API key is valid.
- The base URL is reachable.
- The model ID exists on that provider.
- The selected request format matches the endpoint.
- The extension can authenticate and receive a completion.
Common Kimi K3 API Setup Problems
Too many requests or a subscription message
A web application limit does not necessarily mean that a configured API endpoint is broken. The browser product and API provider can have separate access rules. Check the provider dashboard for quota, available credits, rate limits, or changes to its free-tier policy.
Free access should never be assumed to be unlimited or permanent. Providers can change supported models, allowances, authentication requirements, and pricing at any time.
Invalid API key or authentication error
Confirm that the complete key was copied, with no leading or trailing spaces. Make sure it belongs to the same provider as the base URL. If needed, create a new key and update the custom endpoint settings.
Model not found
This usually means the display name was entered in place of the technical model ID, or that the provider changed its model identifier. Copy the model ID directly from the provider’s current model listing rather than guessing it.
Unsupported endpoint format
If chat completions fails, do not randomly switch through every request type. Verify the provider documentation first. A mismatch between Chat Completions, Responses, and Messages can prevent an otherwise valid key from working.
Vision or image requests fail
Set vision support to false unless the provider explicitly confirms that the selected Kimi K3 endpoint accepts image input through that API format. Enabling unsupported capabilities can produce confusing errors in an AI extension.
The model does not appear in the VS Code picker
Save the form, restart or reload the extension window, and return to the Other Models or custom-model list. Also check that required fields were completed before saving.
Best Practices for Using an AI Coding Model Safely
- Start with small tasks. Ask for an explanation, test plan, or targeted fix before allowing broad multi-file changes.
- Review every proposed edit. AI-generated code can introduce logic, security, or dependency issues.
- Use version control. Commit working changes before applying substantial edits.
- Minimise sensitive context. Exclude passwords, private keys, customer data, and production configuration files.
- Set usage limits where possible. Quotas and expiring keys reduce the impact of an exposed credential or unexpected activity.
- Verify provider status. Model availability and free plans can change, so rely on the dashboard rather than outdated setup details.
Final Checklist
- Created an API key with a Kimi K3-capable provider
- Copied the exact base URL and model ID
- Added a custom endpoint in the VS Code AI extension
- Selected Chat Completions as the request type
- Set vision to false for this text-focused setup
- Saved the configuration and selected Kimi K3 from the model picker
- Confirmed the connection with a simple prompt
With those settings in place, Kimi K3 is available inside the editor for chat-based coding assistance. Move gradually from a simple connectivity test to code explanation, debugging, refactoring, and larger repository tasks while reviewing outputs carefully.
| Create a Kimi K3 API key Use Token Router to check Kimi K3 availability and create the endpoint credentials needed for VS Code. Open Token Router |
Frequently Asked Questions
Can I use Kimi K3 directly in VS Code?
Yes, if your AI coding extension supports custom endpoints and your API provider offers a compatible Kimi K3 model. You need the provider’s API key, base URL, and exact model ID.
Which endpoint type should I choose for this setup?
Select Chat Completions for the configuration described here. Use another request format only when the provider documentation specifies it.
Why should vision be set to false?
The custom model configuration shown is intended for text-based coding assistance. Keeping vision disabled avoids advertising image capability that the configured endpoint may not support.
Is a free Kimi K3 API guaranteed to remain available?
No. API availability, model access, rate limits, quotas, and free-tier terms can change. Check the provider dashboard for the current policy before depending on the integration.