Table of Contents
Claude Code can be used inside Visual Studio Code through a terminal workflow or a dedicated VS Code extension. If a compatible third-party platform provides an Anthropic-compatible API endpoint and API key, you can point Claude Code at that endpoint, select from the models currently offered, and monitor your usage from the provider dashboard.
This guide explains the complete setup process, including installing Claude Code, creating an API key, configuring settings.json, switching models, and avoiding common security and billing mistakes.
What You’ll Learn
- Claude Code can use a compatible custom API base URL instead of a direct subscription connection.
- Your provider dashboard is the source of truth for available models, credits, and usage limits.
- Keep API keys out of repositories, screenshots, and shared configuration files.
- Model availability and promotional credits can change without notice.
What this Claude Code setup does
Claude Code is a coding assistant that runs in your development environment and can work with project files through the terminal or an editor interface. A third-party API platform may expose a compatible endpoint that Claude Code can connect to using:
- An API key created in that platform’s dashboard.
- A custom API base URL.
- A selected model identifier.
- Optional settings for response effort and status information.
This approach can be useful for developers who want model choice, usage-based credits, or a single API endpoint that presents several models. It is not the same as receiving an unlimited official Claude subscription. Credits, rate limits, supported models, and verification requirements are controlled by the API provider and may change.
For the official product and installation guidance, consult Anthropic’s Claude Code documentation. For the editor itself, use the official Visual Studio Code download page.
Before you begin
Prepare these items before changing your configuration:
- A current installation of Visual Studio Code.
- A terminal appropriate for your operating system, such as PowerShell on Windows.
- The latest Claude Code installation from its official documentation.
- An account with an API provider that supports an Anthropic-compatible endpoint.
- An API key generated from that provider’s dashboard.
After installing Claude Code, confirm that it is available in the terminal by running its version command. If the command is unavailable or the version is outdated, reinstall Claude Code using the current official instructions before troubleshooting the editor integration.
Create an API key and check your available credits
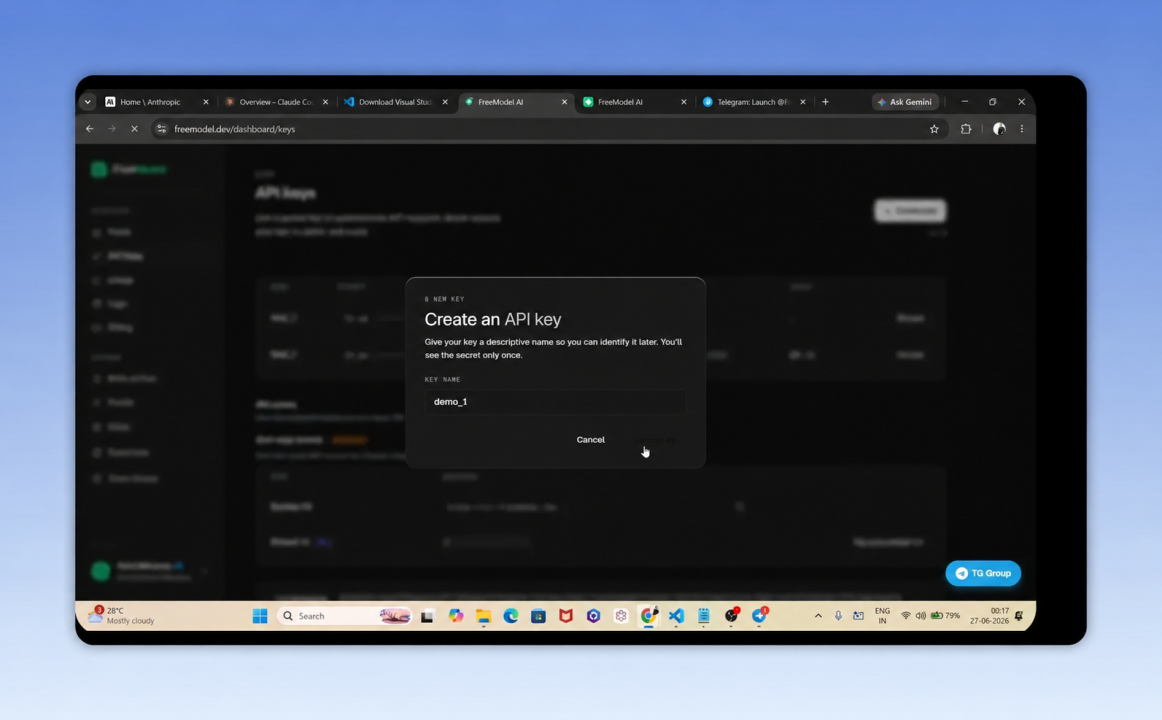
In the API provider dashboard, open the API keys area and create a new key. Give it a clear label such as vscode-claude-code so you can identify and revoke it later.
Copy the key when it is shown. Many services display the full secret only once. Store it in a password manager or another secure secret-storage location, not in a note, chat message, or public repository.
Before configuring Claude Code, review these dashboard pages:
- Usage: Current balance, credit reset timing, and any daily or weekly allowances.
- API keys: Active keys, labels, creation controls, and revocation options.
- Models or routes: The model names and identifiers currently available through the endpoint.
- Request logs: Token usage, request status, and model-level costs where provided.
A credit balance is not a promise of permanent free access. Treat introductory credits and referral rewards as limited promotions, and verify the provider’s current terms, model list, and usage rules before relying on the service for production work.
Configure Claude Code for a custom API endpoint
Claude Code stores local configuration in its user settings directory. On Windows, this is typically inside the current user’s .claude folder. Open that folder in VS Code rather than editing configuration blindly from the terminal.
Open the configuration folder in VS Code
- Open VS Code.
- Select File, then Open Folder.
- Navigate to your user profile directory.
- Open the
.claudefolder created after Claude Code installation. - Open or create
settings.json.
Add the API key and endpoint shown by your provider’s documentation. The following example uses the endpoint supplied by the platform in this setup. Replace YOUR_KEY with your own secret and select a model identifier that is actually available in your dashboard.
{
  "env": {
    "ANTHROPIC_API_KEY": "YOUR_KEY",
    "ANTHROPIC_BASE_URL": "https://cc.freemodel.dev",
    "CLAUDE_CODE_DISABLE_NONESSENTIAL_TRAFFIC": "1"
  },
  "effortLevel": "medium",
  "model": "opus[1m]"
}
The key settings are:
ANTHROPIC_API_KEY: Your provider-issued API credential.ANTHROPIC_BASE_URL: The compatible endpoint Claude Code should call.CLAUDE_CODE_DISABLE_NONESSENTIAL_TRAFFIC: A setting used in the demonstrated configuration to reduce nonessential traffic.effortLevel: The requested level of reasoning effort.model: The default model identifier.
Important: Do not copy another user’s Windows file path into your configuration. If you add a custom status-line command, its path must match your own account folder and local file names. A copied path that includes someone else’s username will fail.
Protect your API key
A JSON settings file containing a live API key is sensitive. Follow these precautions:
- Add
.claude/settings.jsonto.gitignoreif it is inside a project repository. - Never upload the key to GitHub, paste it into issue trackers, or include it in screenshots.
- Revoke a key immediately if you suspect it was exposed.
- Create separate keys for personal experiments and important projects when the provider allows it.
Start Claude Code and select a model
Open a terminal in the project folder you want to work on and start Claude Code. On its first run in a folder, it may ask whether you trust that project directory and whether you want to use the configured API key. Confirm only when you recognise the folder and configuration.
Use the model-selection command in Claude Code to view the supported options and choose one for the current session. The available list can include different model families, but it is dynamic. A model mentioned in a guide may have been removed, renamed, rate-limited, or temporarily unavailable.
If the first request returns an authentication or connection error, check these items in order:
- Confirm that the API key was copied completely and has not been revoked.
- Confirm that the base URL exactly matches the provider documentation.
- Save
settings.jsonand restart the terminal session. - Check that the selected model identifier appears in the provider’s current model list.
- Review the provider dashboard for exhausted credits, verification requirements, or failed requests.
Initial responses can be slower than later requests because the connection and model session may need to initialise. A slow first answer alone does not necessarily indicate a failed configuration.
Use Claude Code from the VS Code interface
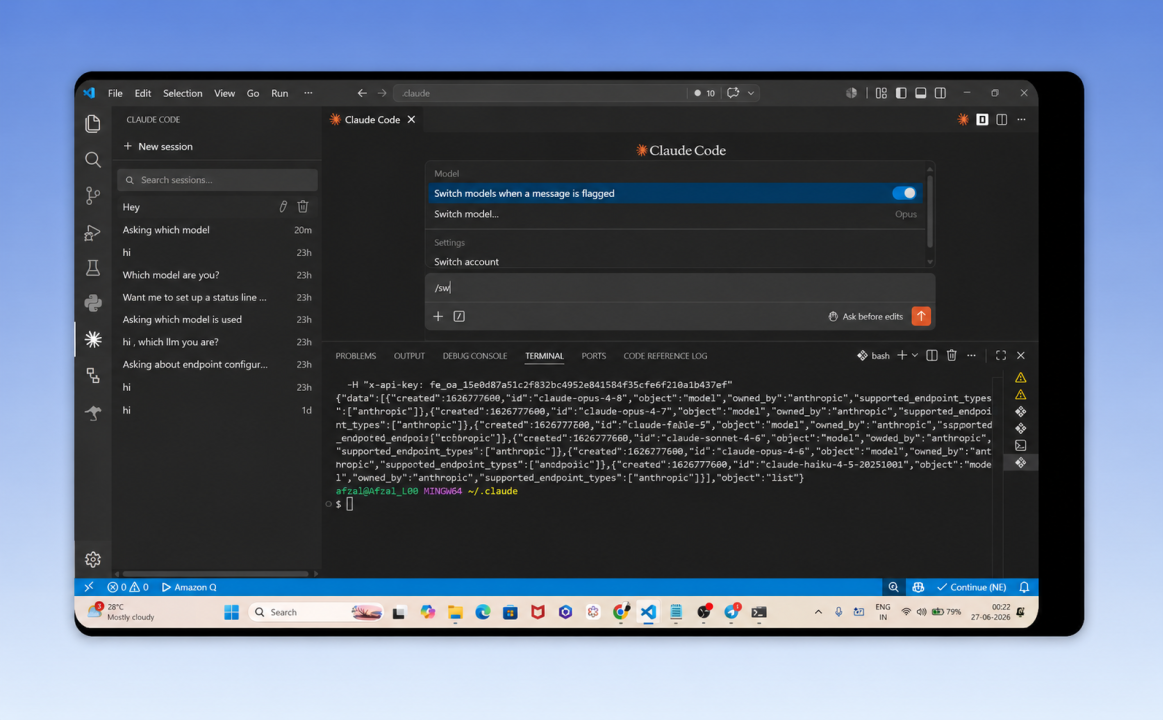
If you prefer an editor panel over a terminal, install a compatible Claude Code extension from the VS Code Extensions view. Search the extension marketplace, install the extension, then begin a new session from its activity-bar icon.
The interface typically provides a prompt box and a model-switching control. This can be more convenient for iterative coding tasks, while the terminal remains useful for direct commands and diagnostics.
For a practical task, give Claude Code a specific goal, constraints, and acceptance criteria. For example:
- “Create a responsive clothing-store landing page with a product grid and no external dependencies.”
- “Find why this test fails, explain the root cause, then propose the smallest safe patch.”
- “Add form validation to this component and write tests for invalid email and empty password cases.”
For larger generation tasks, inspect every created file before running the result. AI-generated code can be useful for a first implementation, but it still needs normal engineering review, testing, dependency checks, and security validation.
How to find the models currently available
Do not rely on a static model list. The provider dashboard and API response are more reliable than an old configuration file. The demonstrated workflow uses an authenticated request to return model metadata, then copies that response into a text editor to inspect the available identifiers.
The exact request format depends on the provider. Use the platform’s own documentation for the correct endpoint and authentication header. Once you identify a valid model ID, update the model value in settings.json or choose it from the Claude Code model menu.
When selecting a model, assess it according to the task rather than assuming the largest option is always best:
- Fast iterations: Prefer a responsive, lower-cost model for small fixes and short questions.
- Complex refactors: Use a stronger reasoning model when analysing a larger codebase or planning architectural changes.
- Long-context work: Check the provider’s stated context capacity and watch total token usage.
- Experiments: Start with a small, clearly scoped task before spending credits on a large build.
Monitor token use and API spending
Usage monitoring is essential when credits are limited. Claude Code can show session context and token information, while the provider dashboard can show balances, request history, and model-related consumption.
Check your usage after requests that are likely to be expensive, including:
- Generating a multi-file application.
- Analysing a large repository.
- Repeatedly asking for full-file rewrites.
- Working with long logs, datasets, or pasted documentation.
- Using higher-effort reasoning settings.
Simple ways to make credits last longer
- Ask for a plan before asking for implementation.
- Provide precise file names, expected behaviour, and constraints.
- Request a focused patch instead of regenerating an entire project.
- Paste only the relevant error output and source code.
- Use a lower-cost option for routine edits when it is adequate.
- Review and test changes locally before requesting another iteration.
Do not attempt to bypass account limits, verification rules, or usage policies by creating or rotating multiple accounts. Use the service through accounts and credits permitted by the provider’s terms. If your work requires dependable high-volume access, choose an authorised paid plan or an official API arrangement instead.
Common Claude Code configuration problems
The claude command is not recognised
This usually means Claude Code is not installed correctly, the terminal needs to be reopened, or the installed version is outdated. Reinstall using the current official installation instructions and verify the installed version before returning to VS Code.
The API key does not connect
Check for whitespace, an incomplete copied key, a missing environment field, or a key created under a different account. Confirm the endpoint and key format in the provider dashboard. A newly created key can also require a brief initial connection attempt before it works consistently.
A model is missing from the menu
The provider may have changed its supported catalogue. Check the live models or routes page and use the currently listed identifier. Do not substitute a guessed model name.
Claude Code reports insufficient credit or a rate limit
Review the usage dashboard for remaining balance, allowance reset timing, and request history. Wait for the legitimate reset period, reduce the scope of the next task, or add credit through an approved provider option.
VS Code opens the wrong configuration folder
Make sure you opened the .claude directory under the active operating-system user profile. On shared machines, different Windows accounts have different home folders and separate settings.
Best-practice workflow for AI coding assistance
A reliable workflow is more valuable than simply choosing a powerful model. Use this sequence for project work:
- Describe the outcome: State the feature, technical stack, and success criteria.
- Request an implementation plan: Ask which files need changing and why.
- Approve the scope: Prevent unnecessary rewrites before code is generated.
- Implement in small steps: Start with one component, endpoint, or bug fix.
- Run tests and linting: Use your normal local quality checks.
- Review the diff: Check security, error handling, dependencies, and unintended changes.
- Track cost: Inspect usage after large requests and adjust your prompting approach.
This method gives you more control over code quality, token spend, and project safety than asking for an entire application in a single broad prompt.
Next steps
Set up the endpoint, test it with a small coding request, then validate that the provider dashboard records the request correctly. Once the connection is stable, choose models based on the live catalogue and your task requirements, not on claims of unlimited or permanent free access.
| Set up a FreeModel API account Create an account, review the current credits and available models, then generate a key for Claude Code. Open FreeModel |
Frequently Asked Questions
Is Claude Code free to use with a third-party API endpoint?
It depends on the provider’s current credit offer, pricing, model availability, and account rules. A third-party endpoint can provide promotional or limited credits, but it should not be treated as guaranteed unlimited access.
Where do I put the Claude Code API key?
Add the key to the Claude Code configuration in the env section, using the provider’s documented environment variable and endpoint. Keep the file private and out of version control.
Why is the model I want not available?
Model catalogues can change. Check the provider dashboard or authenticated model-list response for the exact names that are currently supported by your API key.
Can I use this setup in the VS Code editor instead of the terminal?
Yes. Install a compatible Claude Code extension in VS Code, begin a new session, and use its model-selection control. The terminal is still helpful for initial installation and troubleshooting.